Reinforcement Schedules
Reinforcement schedules can be created either as Word OpenXML (.docx) document or in the SOFiSTiK Report Browser (.plb).
Word OpenXML (.docx)
The Word OpenXML document is a printable document in the “docx” file format. This reinforcement schedule will be created based on the docx template set in the Schedule tab in the Settings dialog.
- Whether the Schedule command is called from SOFiCAD or from Reinforcement Detailing, the mechanism in background does the following:
Creates a Data Base file in project folder (.RDB file)
According to a DOCX Template it generates a DOCX Word Document for a specific plan reading the information from the Data Base file.
- The available parameters are describing:
Project properties
Revision properties
Sheet properties
Table properties.
- Tables are also divided in more types
Weight summary tables
Table for rebar bending schedule
Table for fabric schedule
Table for Mounting parts schedule
Bar spacers tables
Fabric cut tables
List fabric table
End treatment table
Tip
Parameters describing project, revision and sheet properties can be written anywhere in the document and they will retrieve the information from the data base file. The parameters for the tables can be written only in their corresponding table defined in the cell conteining the key @sofistik.
In the following table you can see the main sections from a @sofistik table

Heading Lines
The number of lines for heading is not the same from table to table. In the described example there are two lines assigned.
These lines will repeat itself with the same content of parameter from page to page.
Repetitive line
In these lines is written the main content of the table.
If there is nothing to be listed in this type of schedule the table will be deleted completely. This means it was nothing exported to the .rdb data base for this table.
The number of these lines might vary. The program will interpret that all the lines between Heading-Table-lines and Table-definition-and-properties-line will repeat itself with each input of a new item in the schedule.
Table definition and options
The definition of the table should be done in one cell/line.
In the first line of the cell should be “@sofistik”. Like this we mark the table as a SOFiSTiK table that should behave like it is defined in the second line.
The second line should contain the name of the table. Syntax is table: name_of_the_table
The 1st and 2nd line are mandatory for a table. Starting with 3rd line are defined the rules of the table and is not mandatory to respect a specific order or even to define a rule.
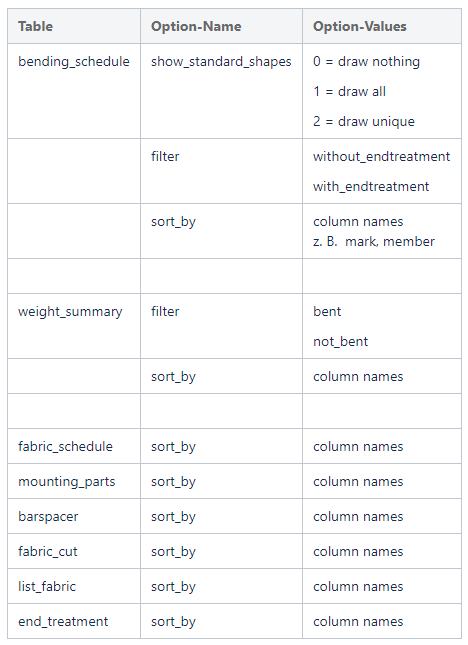
This are the options for a @sofistik table:
Last line
The last line is optional in the schedules.
It is used to write parameters containing total quantities or simply text containing general information about the table.
Tip
If the tables are marked in different bookmarks they will be automatically deleted if they don’t list any item from data base file.
Customization
To customize the output, its recommended to:
Open the runtime folder with the supplied docx template file.
Copy and rename the original template and open it in your prefered OpenXML editor (e.g. Microsoft Word).
Start changing the appearance (font styles, text sizes, table layouts, colors etc.) as desired.
Add or remove SOFiSTiK Schedule Parameters to change provided schedule information.
Schedule Parameters
The following schedule parameters, separated by the kind of information and schedule type, are currently available.
Project -, Sheet - and Revision Information
Using the following parameters you can retrieve the Revit Project -, Sheet - and Revision Information.
Example, how to represent the project client name:
Click Manage tab
 Settings panel Project Information Type in the project client name and click OK.
Add the corresponding parameter in the list below using the following syntax:
Syntax
{project.client_name}
Project Information {project.xyz}:
|
|
Sheet Information {sheet.xyz}:
|
|
Revision Information {current_revision.xyz}:
|
|
Rebar Weight Schedule - Straight Bars {xyz}
You can use the Weight Schedule in order to document the weights of your reinforcing bars separated by its diameters. Additionally the Weight Schedule provides a filter to show only bent - or not bent bars.
Filter: bent
to get a Weight Schedule for the bent bars only.Filter: not_bent
to get a Weight Schedule for the straight bars only.Filter: no_filter
to get a Weight Schedule for all bars.

|
|
Tip
To get separate weight schedules for straight and bent bars it is recommended to duplicate the schedule and change the filter accordingly.

Rebar Bending Schedule {xyz}
The Shape Schedule contains all the required information to bend the rebars.
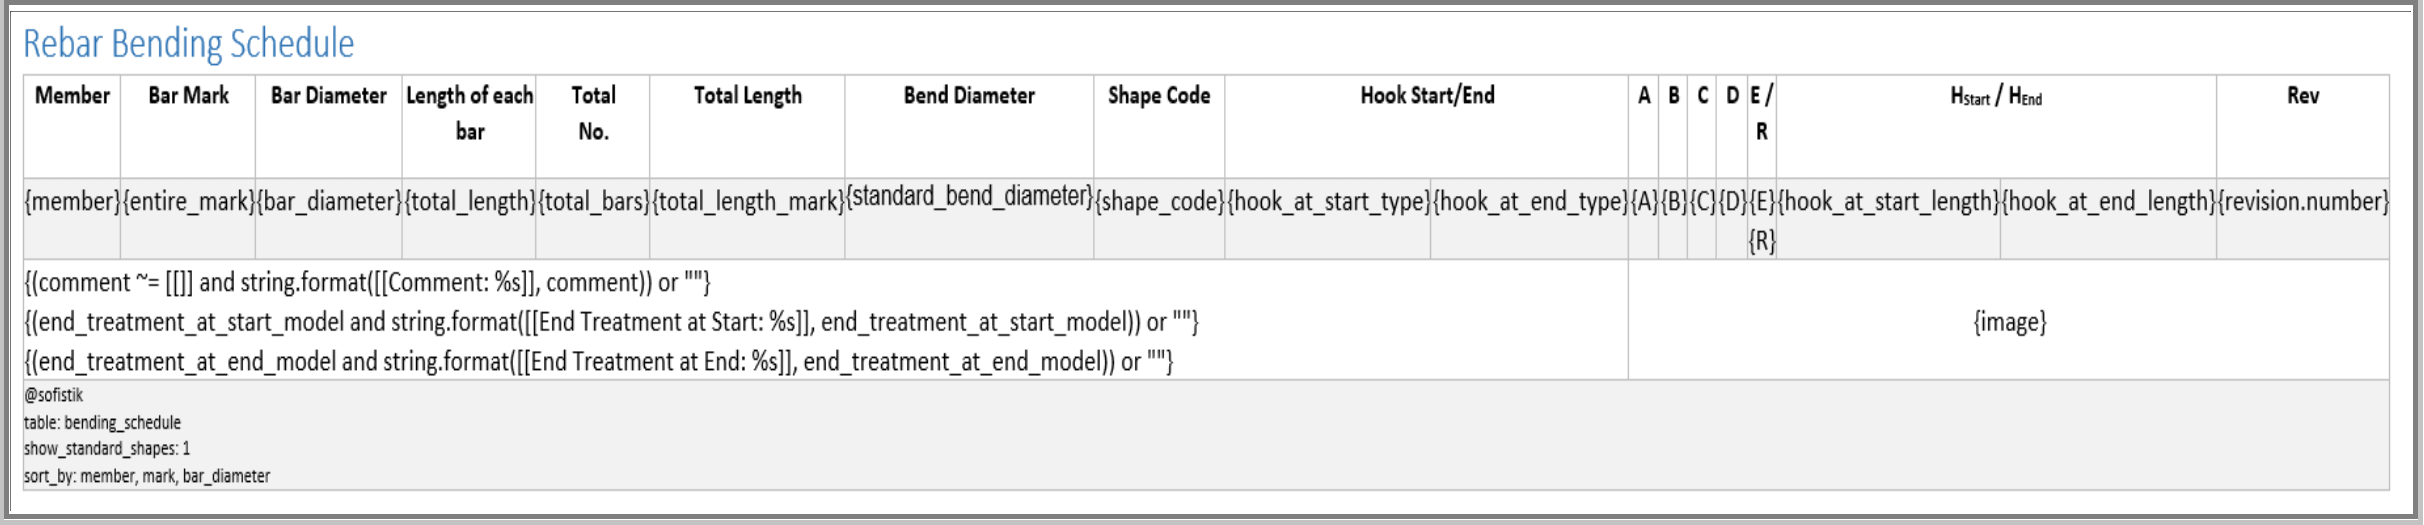
To get shape image only for non-standard shapes, you can set the parameter show standard shape: 0.
|
|
End Treatment {xyz}

The End Treatment table contains all the types of coupler which implies an end treatment
|
|
Fabric Schedule {xyz}

|
|

Fabric Cut Schedule {xyz}

|
|
Translation Table
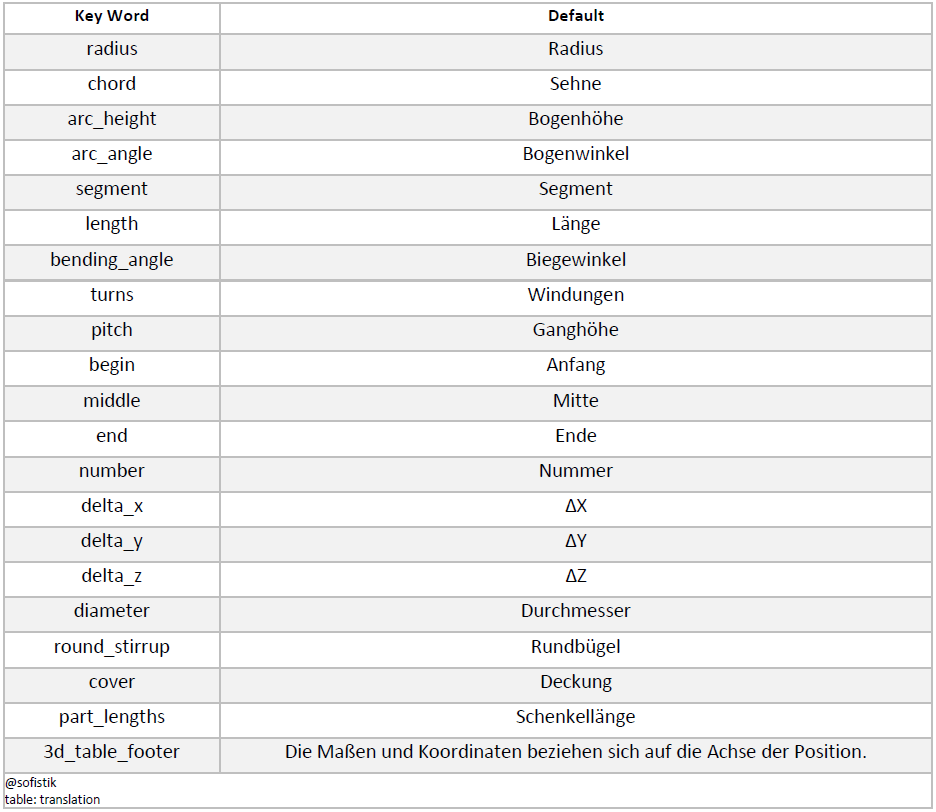
The translation table will not be generated in the resulted document. It is used only in template to translate the texts generated by default when reading informations from data base.
Function text_if
Will write a text from a parameter(s) if this parameter is filled. With text_if function we can add prefix and/or suffix for parameters.
- Syntax:
text_if(“Prefix”, variable, “Suffix”)
text_if(“Prefix”, variable)
text_if(variable, “Suffix”)
text_if(variable1, variable2)
Example in Word-Template:
Assumption 1: comment = “This is a comment” , member = “m1”
{text_if([[Comment: ]], comment)}
{text_if([[Comment ]], comment, [[. And finish]])}
{text_if([[Comment: ]], comment, member)}
Assumption 2: comment = “”, member=”m1”
{text_if([[Comment: ]], comment)}
{text_if([[Comment: ]], comment, [[. And finish]])}
{text_if(comment, member)}
SOFiSTiK Report Browser (.plb)
The SOFiSTiK Report Browser provides reinforcement schedules as printable document in the SOFiSTiK “plb” file format. Adjustments of the output can be done either in the schedule tab of the settings dialog or in the Settings Files.
Settings Dialog
The Settings dialog provides the user-specific adjustments of the reinforcement schedule. For example, the output volume and units, the desired language of the document and the option to create a BVBS reinforcement exchange file (abs).
Click Schedule tab
 (Settings…).
The Settings dialog displays.
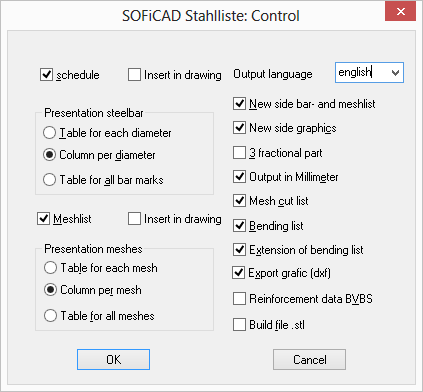
Edit the Schedule settings.
Settings Files
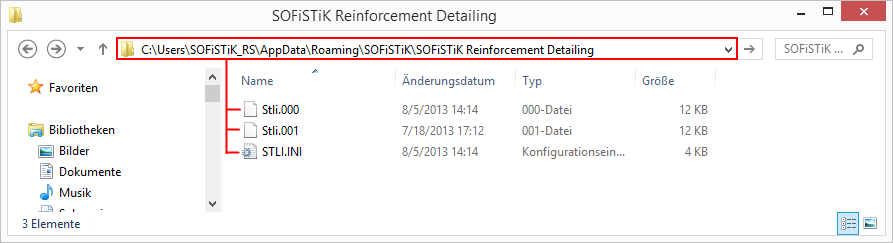
The basic settings are defined in external files which can be modified with a text editor and accessed in the following directory:
%AppData%\SOFiSTiK\SOFiSTiK Reinforcement Detailing 2018
The directory contains:
STLI.ini, General settings file (text- and line styles, language files, DXF-parameter etc.).
Stli.000, German language file.
Stli.001, English language file.
Stli.00x, Your own customized language file (see Adding a Language).
Tip
To add a new language for the reinforcement schedule, copy, rename and translate an existing language file. After this procedure, new language will be available in the Settings dialog.
Adding a Language
You can add language files for an output of reinforcement schedules in the language of your wish.
Recommended workflow to create, customize and add a language:
Open the directory of the settings files in the explorer.
Copy the file “Stli.001” and rename it to “Stli.002”. You can create up to 10 language files (stli.000, stli.001, stli.003, …,stli.009).
Open the general settings file STLI.INI in a text editor (e.g. WordPad) and set the newly created language file.
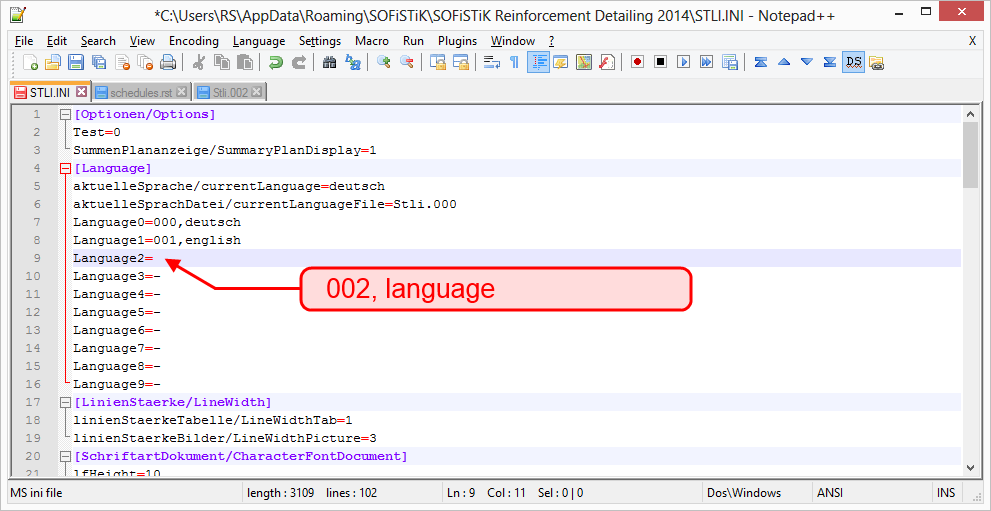
Edit the file by deleting the minus character and set your new language file using the following syntax: [file extension], [language name]. After restarting the SOFiSTiK Report Browser your new language will be available in the Settings dialog.
Open the newly created language settings file (in this case “stli.002”) in a text editor (e.g. WordPad).
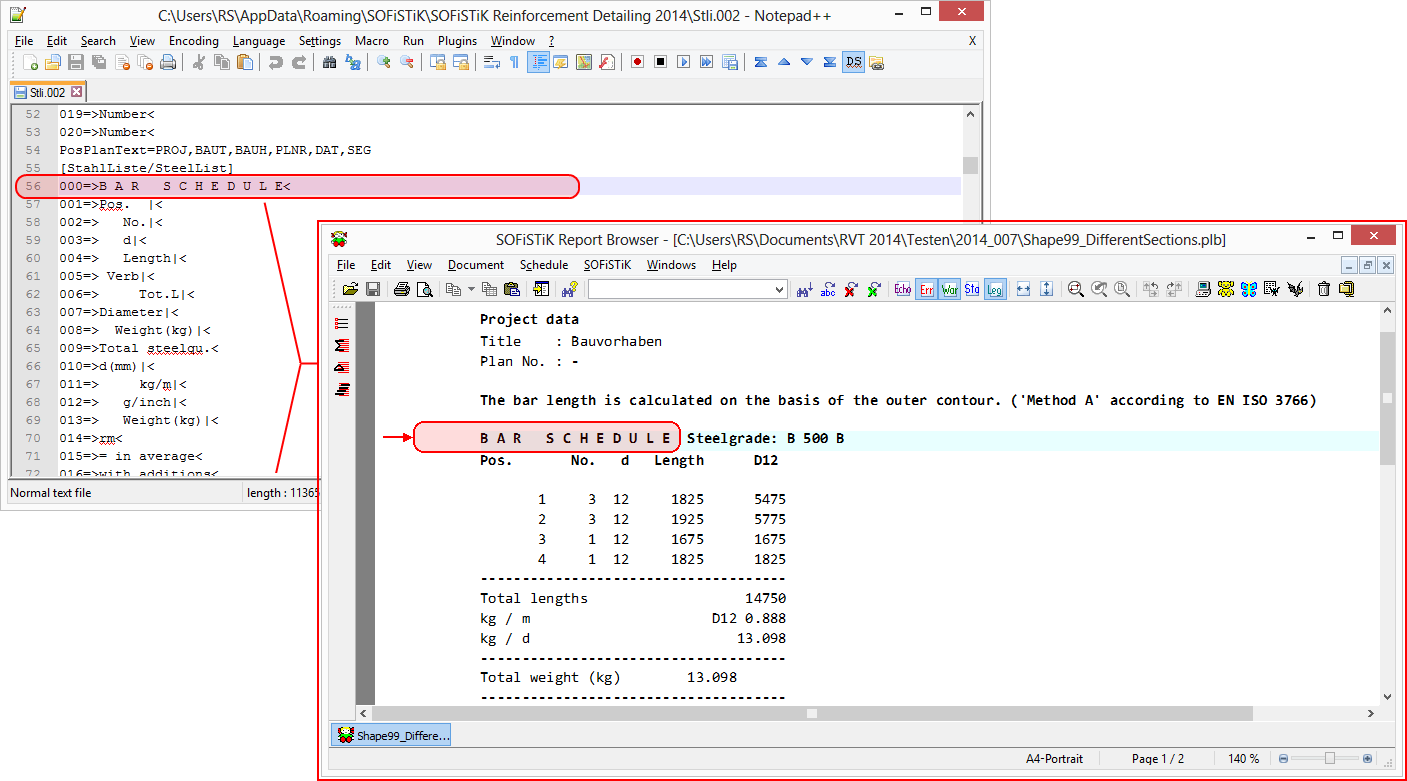
Edit the parameter by translating the names between the following two characters:
> your trans- | lation <.Optionally you can add
space characters to define the width of the associated column in the schedule.
“|” character (vertical line) to separate the word and define a line break.
The parameters are grouped according to different kinds of reinforcement schedules (e.g. bending schedule, mesh schedule).
Note
Customization of the schedule in the SOFiSTiK Report Browser requires advanced knowledge. For further questions regarding this issue, please contact our support.


